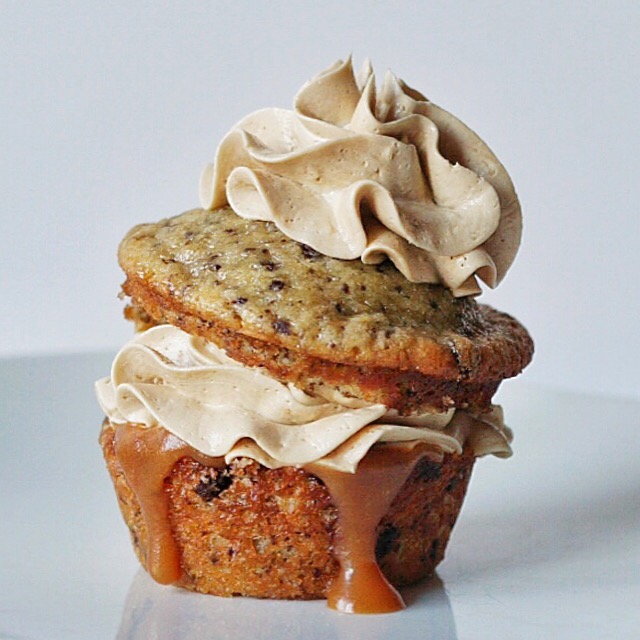
ChocoChip Monkey Salty Caramel + Espresso Cloud Muffin
Perfect combination of textures – soft banana-chocolate chip muffin combined with the fluffy espresso cream makes this a special heavenly treat!
Ingredients:
For Roasted Banana Muffin:
- 1 1/4 cups bananas (approximately 3-4 ripe bananas)
- 2 cups all-purpose flour (250 grams)
- 1 1/4 cups granulated sugar (250 grams)
- 2 teaspoons baking powder
- 1/2 teaspoon baking soda
- 1/2 teaspoon coarse sea salt
- 1 cup plus 2 tablespoons whole milk at room temperature
- 1 large egg at room temperature
- 1/2 stick unsalted butter (melted)
- 2 teaspoon pure vanilla extract
- 3/4 cup chopped chocolate chips (Ghirardelli 60% cocoa).
For Fluffy Espresso Buttercream:
- 2 sticks unsalted butter, softened (warmer than room temperature)
- 290 grams confectioner’s sugar, sifted
- 1/3 cup heavy whipping cream
- 1 1/2 teaspoon instant King Arthur espresso powder
- 1 teaspoon pure vanilla extract
- Pinch of salt
Directions:
For Roasted Banana Muffin:
- Preheat oven to 400F degrees.
- Line use baking oil spray for 12-tray muffin tins or use baking liners.
- To roast bananas:
- Make 3-4 inch slits along each banana and lay on baking sheet.
- Bake bananas for 10-15 minutes or until the juice starts to run from the slits (the skins will turn black)
- Remove the bananas from oven and allow them to cool.
- Once cooled down, remove the peels from the bananas and mash them in a small bowl and set aside (alternative option is to place the mashed bananas in food processor).
- In a large bowl, whisk together flour, sugar, baking powder, baking soda and salt.
- With whisk attachment on standing mixer, on medium speed, combine the milk, egg (first beat egg with fork in small bowl before adding to milk), pure vanilla extract and melted butter.
- Change out the whisk attachment to paddle attachment, on low speed, stir in mashed roasted bananas.
- Add flour and sugar mixture to the wet ingredients and stir until just combined (To avoid overmixing, you can use a wooden spoon to stir together the wet and dry ingredients).
- Add chopped chocolate chips to mixture (you can either hand chop with a sharp knife the chocolate chips or use a food processor – I prefer the hand chopped texture to the muffin, which adds a nice flakiness to the chocolate chip rather than mini chocolate chip bits).
- Use 3 oz. ice cream scoop and fill the muffin tins to 80% full.
- Bake in oven for 15-18 minutes (toothpick test – the toothpick should come out clean).
For Fluffy Espresso Buttercream:
- With paddle attachment on standing mixer, combine unsalted butter and confectioner’s sugar on low speed (KitchenAid mixer speed 2) for approximately two minutes.
- Add pure vanilla extract and espresso powder and continue to mix for another two minutes.
- Add heavy whipping cream and pinch of salt and increase mixer speed to medium-high (KitchenAid mixer speed 6) for another two minutes.
- Stop the mixer and scrap down the sides of the bowl and mix on high (KitchenAid speed 8) for a few seconds.
- Ready to be used immediately or can be stored in air tight container at room temperature for up to three days (The buttercream can be stored in refrigerator, but will take time to reach room temperature before it can be used).
Assembling:
- See Salted Caramel Sauce Recipe.
- Use a serrated knife to cut off the top of each muffin.
- Use a piping bag with a thin long tip or round decorating tip and fill bag with caramel sauce.
- Fill the bottom half of the muffin with about 1/2 teaspoon to 1 teaspoon salted caramel sauce (sometimes I let it overflow a little bit and it will drip over on the side of the muffin).
- Use a piping bag with desired decorating tip and fill bag with espresso buttercream.
- Pipe one layer of buttercream on the bottom layer of the muffin.
- Place the top of the muffin on top of the buttercream.
- Finishing touches with a small amount of buttercream on top.
Indulge on your breakfast muffin!

Photo credit: Ashley Sears
Photo credit: Ashley Sears
Photo credit: Ashley Sears
Photo credit: Ashley Sears


